Setup and Start
Installing the app
HakkinFF1 doesn't use an installer. The release is a zip archive containing a single executable and its license files. You put the executable in a folder and run it.
Windows
- Download the latest
Windowsfile and verify its SHA-256. -
Pick a folder that you can write to without administrator rights, for example
C:\Users\<you>\Apps\HakkinFF1orD:\Tools\HakkinFF1. Don't use protected system folders likeC:\Program Files: it's read-only for standard accounts, and the app reads shared extensions from anextensionsfolder next to the executable, which you'll want to be able to edit. - Right-click the zip, choose Properties, and if there's an Unblock checkbox at the bottom, check it and click OK. If you skip this, Windows flags every extracted file as downloaded from the internet.
-
Right-click the zip, choose Extract All..., and extract it into the folder from step 2.
You'll get:
HakkinFF1\
  HakkinFF1.Desktop.exe               the app
  LICENSE.txt                         Apache License 2.0
  NOTICE.txt                          copyright and licensing notice
  THIRD-PARTY-NOTICES.txt             licenses of the components the app includes
  TRADEMARKS.txt                      trademark policy for the HakkinFF1 name and icon
-
Double-click the
.exeto start the app. The executable isn't code-signed, so Windows SmartScreen may show Windows protected your PC. Click More info, then Run anyway. Windows shouldn't ask again for that file. - Optional: right-click the
.exeand choose Pin to Start, or create a desktop shortcut.
The app opens on the Welcome view.
Where things are stored. App settings, including the recent-projects list, are
saved per user in %AppData%\HakkinFF1\appsettings.json. Each project is self-contained in its own folder,
wherever you create it. That means you can update by replacing the .exe with a newer one, and your settings
and projects stay as they are.
Linux
The Linux build is for 64-bit x86 (x64) PCs with a graphical desktop. It includes the .NET runtime, so you don't need to install .NET.
- Download the latest
Linuxfile and verify its SHA-256. -
Pick a folder in your home folder, for example
~/Apps/HakkinFF1. Don't use system folders like/optor/usr/local: they're owned by root, and the app reads shared extensions from anextensionsfolder next to the executable, which you'll want to be able to edit. -
Extract the zip into that folder from a terminal:
mkdir -p ~/Apps/HakkinFF1
unzip ~/Downloads/HakkinFF1.Desktop-<version>-linux64.zip -d ~/Apps/HakkinFF1
You'll get:HakkinFF1/ HakkinFF1 the app LICENSE.txt Apache License 2.0 NOTICE.txt copyright and licensing notice THIRD-PARTY-NOTICES.txt licenses of the components the app includes TRADEMARKS.txt trademark policy for the HakkinFF1 name and icon
The zip keeps the app's execute permission, so it's ready to run. -
Start the app from a terminal:
cd ~/Apps/HakkinFF1
./HakkinFF1
After the first time, only these two lines are needed. In GNOME Files, you can instead right-click inside the folder and choose Open in Terminal, then type just./HakkinFF1. Leave the terminal open while you use the app: closing it closes the app too.
The app opens on the Welcome view.
Why a terminal? GNOME Files, the file manager on Ubuntu, Zorin OS, and other
GNOME desktops, doesn't start programs on a double-click. Double-clicking HakkinFF1 shows
There is no app installed for "Executable" files, and no setting changes that. Other file
managers, such as Dolphin on KDE and Thunar on Xfce, may still start it on a double-click. Starting it from a terminal
works on every desktop, and any startup error is printed there.
Where things are stored. App settings, including the recent-projects list, are
saved per user in ~/.config/HakkinFF1/appsettings.json (or under $XDG_CONFIG_HOME if you've
set it). Each project is self-contained in its own folder, wherever you create it. To update, extract the newer
release into the same folder, replacing the old files. Your settings and projects stay as they are.
If it doesn't start. Read the error in the terminal.
- Permission denied: the execute permission was lost, which can happen if you
extracted the zip with something other than
unzip. Runchmod +x HakkinFF1in the app's folder, then try again. - A message that mentions ICU: install your distribution's ICU library package
(usually named
libicuoricu).
macOS
There are two macOS downloads: one for Apple Silicon Macs (M1 and later) and one for Intel Macs. To check which you have, open the Apple menu and choose About This Mac: it lists either a Chip (Apple Silicon) or a Processor (Intel). Each build includes the .NET runtime, so you don't need to install .NET.
- Download the latest
macOSfile for your Mac and verify its SHA-256. -
Pick a folder in your home folder, for example
~/Apps/HakkinFF1. The app reads shared extensions from anextensionsfolder next to the executable, which you'll want to be able to edit. -
Extract the zip into that folder from Terminal:
mkdir -p ~/Apps/HakkinFF1
unzip ~/Downloads/<file name>.zip -d ~/Apps/HakkinFF1
You'll get:HakkinFF1/ HakkinFF1 the app LICENSE.txt Apache License 2.0 NOTICE.txt copyright and licensing notice THIRD-PARTY-NOTICES.txt licenses of the components the app includes TRADEMARKS.txt trademark policy for the HakkinFF1 name and icon
-
Mark the app as executable, and clear the "downloaded from the internet" flag macOS puts on downloaded files:
chmod +x ~/Apps/HakkinFF1/HakkinFF1
xattr -c ~/Apps/HakkinFF1/HakkinFF1
The app isn't signed or notarized by Apple. Without the second command, macOS refuses to open it. -
Start the app from Terminal:
~/Apps/HakkinFF1/HakkinFF1
You can also double-click it in Finder, which opens a Terminal window that stays open while the app runs.
The app opens on the Welcome view.
Where things are stored. App settings, including the recent-projects list, are
saved per user in ~/.config/HakkinFF1/appsettings.json. Each project is self-contained in its own folder,
wherever you create it. To update, extract the newer release into the same folder, replacing the old files, then run
both commands from step 4 again. Your settings and projects stay as they are.
If it doesn't start. If macOS says the app
can't be opened because Apple cannot check it, open System Settings,
go to Privacy & Security, and click Open Anyway next to the
message about HakkinFF1. On an Apple Silicon Mac, if Terminal prints killed, give the app a local
signature and try again:
codesign --force --sign - ~/Apps/HakkinFF1/HakkinFF1
The New Project view
The three kinds of project are all created from the Welcome view's New Project button. The form is the same for each; the Serializer you choose decides what kind of project you get. That choice is permanent for the life of the project.
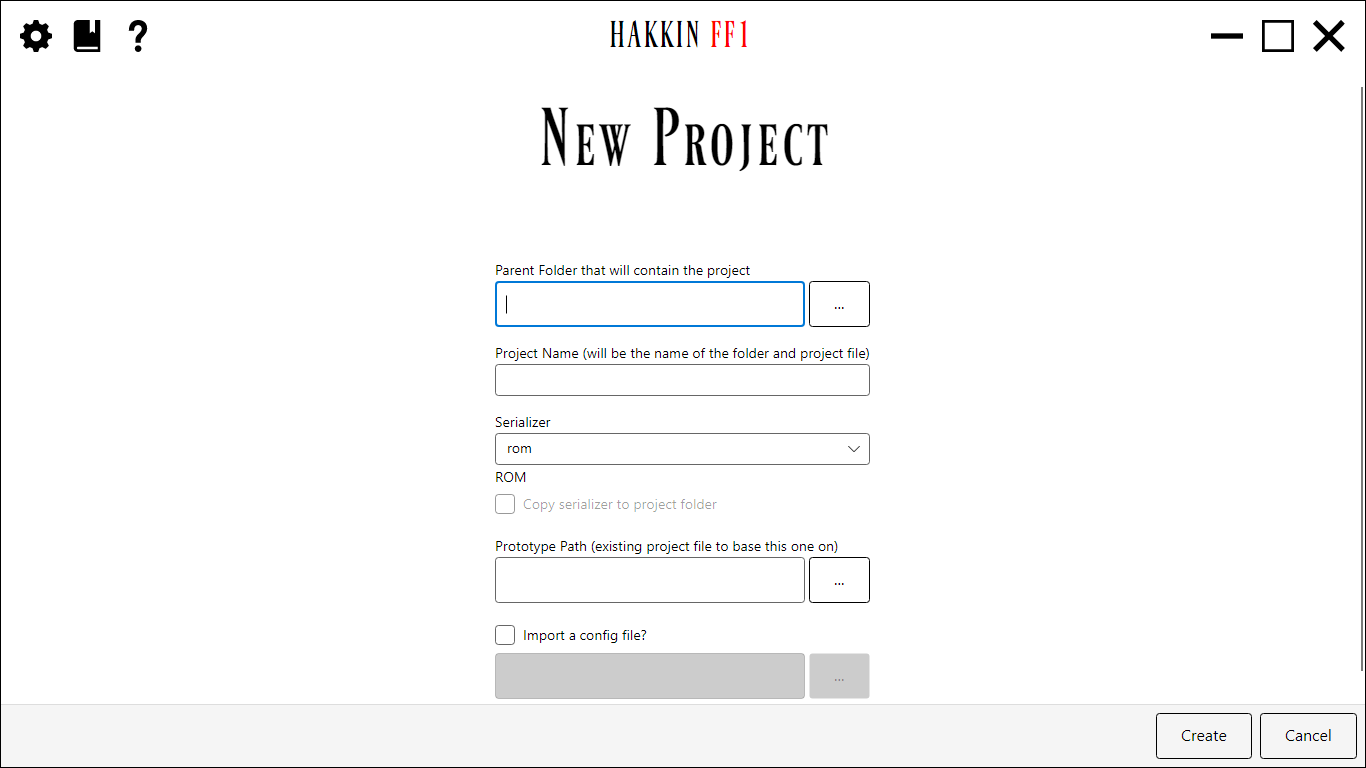
| Field | Detail |
|---|---|
| Parent Folder that will contain the project | The folder in which the project's own folder will be created. |
| Project Name | Becomes both the project folder's name and the project file's name. |
| Serializer |
How the project's files are read and written. The built-ins are listed first: rom,
disch, and anomiex. After them come any extensions found in the app's
extensions folder, then Custom... to browse for an extension DLL or a
.hff1ext bundle. The list shows each serializer's identifying name, and its friendly name appears
just below the dropdown. |
| Copy serializer to project folder |
Only used for extension serializers (it's disabled for the built-ins). Check it to copy the extension into the
project's own extensions folder, so the project travels with its serializer. |
| Prototype Path | The existing file the new project is based on. A ROM project uses an NES ROM
(*.nes); assembly projects use a disassembly archive (*.zip). |
| Import a config file? |
Optional. Check it and choose an FFHackster/FFHacksterEX .dat config file to bring its labels, smart
tools, and tint settings into the new project. Anything the file doesn't provide gets the defaults. |
Click Create to build the project and open it on the Landing view, or Cancel to return to the Welcome view. The app checks the prototype and config paths before it creates anything. If either file can't be found, it says so and leaves the disk untouched.
Creating a ROM project
A ROM project edits a copy of an NES ROM image directly. It's the simplest kind of project and needs nothing besides a ROM.
- On the Welcome view, click New Project.
- Choose the Parent Folder and type a Project Name.
- Leave Serializer set to
rom(the default). - For Prototype Path, browse to a clean Final Fantasy (NES) ROM. The app never modifies it; the project works on a copy.
- Optionally, import an FFHackster/FFHacksterEX
.datconfig. - Click Create.
If you leave Prototype Path empty, the project starts with a blank (zero-filled) ROM. That's rarely what you want, so supply a ROM unless you mean to.
Files in a ROM project
<Parent Folder>\<Name>\
  <Name>.ff1r                      project file: name, type, serializer, description, author, link, dates
  <Name>.ff1d                      project data: labels, ROM/RAM values, editor and tool lists, editor settings
  <Name>.dialogue                  sprite dialogue routine definitions (plain text, hand-editable)
  workrom.nes                       the working ROM; every editor save writes to it
  <Name>.ff1s                      saved UI state for editors and tools (created when first needed)
  sharedextensionsettings.json      extension settings readable by any module (created when needed)
  privateextensionsettings.json     extension settings private to each module (created when needed)
  extensions\                       only present when an extension was copied into the project
| File | Purpose |
|---|---|
<Name>.ff1r | The file you open to load the project. JSON, holding the project's identity: its name and type, the serializer it uses (stored so the project still opens after it's moved), and the description, author, link, and created/last-edited dates you see in Project Settings. |
<Name>.ff1d | Project data, in JSON. It holds the label lists (maps, shops, battles, AI, teleports, and more), the ROM Values and RAM Values tables, the order and module choice for Landing's tools and editors, per-editor settings, smart tools, and tint settings. |
<Name>.dialogue | The routine definitions the
Sprite Dialogue editor uses, in a hand-editable format close to
FFHacksterEX's own .dialogue files. |
workrom.nes | The ROM being edited. Saving in any editor writes to it, so it's always up to date and ready for Publish or Run. |
<Name>.ff1s | UI state that needs to persist even when you cancel out of an editor, for example the In-Game Text editor's per-section View with DTE toggles. |
*extensionsettings.json | Settings saved by editor and tool extensions: one shared file and one private file. |
Creating a Disch assembly project
A Disch project is built on Disch's Final Fantasy Disassembly 1.0.
The assembly source is the real project: the app reads the game data out of it, and saving an editor writes the changed
data back into the .asm and .bin source files. The ROM is assembled from that source when you need
it.
- Download the Disch disassembly archive (a
.zip). The project is created straight from the zip, so you don't need to extract it. - On the Welcome view, click New Project.
- Choose the Parent Folder and type a Project Name.
- Set Serializer to
disch(shown as Disch 1.0). - For Prototype Path, browse to the disassembly
.zip. - Optionally, import an FFHackster/FFHacksterEX
.datconfig. - Click Create. The app extracts the source into the project's
asmfolder and reads the game data from it.
No toolchain to install. To build workrom.nes, the app runs its own bundled
copies of the cc65 assembler and linker (ca65/ld65), the same steps the disassembly's
build.bat performs. That's why Publish and Run work for Disch projects on every platform, and why the
archive's own ca65.exe/ld65.exe aren't copied into the project.
Files in a Disch project
<Parent Folder>\<Name>\
  <Name>.ff1a                      project file (assembly project)
  <Name>.ff1d                      project data, as for a ROM project
  <Name>.dialogue                  sprite dialogue routines, plus the bank addresses used to resolve source labels
  <Name>.asmrecs                   where each piece of editable data lives in the source
  asm\                              the disassembly source: the project's source of truth
    nesheader.bin, nes.cfg            iNES header and linker layout
    bank_00.dat ... bank_0F.asm       the 16 PRG banks
    bin\                              binary data blocks (weapon/armor/magic/enemy data, text, maps...)
    Constants.inc, variables.inc, macros.inc, table_*.tbl, build.bat, ...
  workrom.nes                       assembled from asm\ when Publish or Run needs it
  <Name>.ff1s, *extensionsettings.json, extensions\   as for a ROM project
| File | Purpose |
|---|---|
<Name>.ff1a | The file you open to load the project, in the same JSON format as
.ff1r. The .ff1a extension marks it as an assembly project. |
<Name>.asmrecs | The project's catalog of assembly data records. Each record maps one piece of game data the editors work with (weapon data, shop data, a lookup table, and so on) to the source file and label it lives at. Saving an editor writes back only the records that editor changed. It starts as a copy of the app's built-in Disch catalog, and records added to the app in later versions are merged in when you open the project. |
asm\ | The extracted disassembly. You can open and edit these files in your own editor too. The app reads the game data back from the source whenever it opens the project. |
<Name>.dialogue | As for a ROM project. In an assembly project its
bankaddr= entries also tell the app which address each source label corresponds to. |
workrom.nes | A build output, not a source file. It's rebuilt whenever it's missing or older than your last save. |
Creating an Anomie assembly project
An Anomie project is built on Anomie's Final Fantasy disassembly,
shown in the app as Anomiex. Its bank listings (b00.txt to b15.txt)
are the project's source. Saving writes changed data back into the matching lines of those listings.
- Download the Anomie disassembly archive (a
.zip). Don't extract it. - On the Welcome view, click New Project.
- Choose the Parent Folder and type a Project Name.
- Set Serializer to
anomiex. - For Prototype Path, browse to the disassembly
.zip. The app finds thebXX.txtfiles whether they're at the archive's root or inside a folder (newer releases useff/). - Optionally, import an FFHackster/FFHacksterEX
.datconfig. - Click Create.
No build step. Anomie's listings already contain the final bytes, so the app
writes workrom.nes directly, without assembling anything.
The app can only read the parts of the ROM that its Anomiex catalog covers. Anything the catalog doesn't cover reads back as zero.
Files in an Anomie project
<Parent Folder>\<Name>\
  <Name>.ff1a                      project file (assembly project)
  <Name>.ff1d                      project data, as for a ROM project
  <Name>.dialogue                  sprite dialogue routine definitions
  <Name>.asmrecs                   where each piece of editable data lives in the listings
  asm\                              the disassembly: the project's source of truth
    b00.txt ... b15.txt               one listing per bank
  workrom.nes                       written from the listings when Publish or Run needs it
  <Name>.ff1s, *extensionsettings.json, extensions\   as for a ROM project
These files do the same jobs as in a Disch project. The difference is that
<Name>.asmrecs starts from the app's Anomiex catalog, and its records point at lines in the
bXX.txt listings rather than at .asm/.bin files.
Loading an existing project
On the Welcome view, click Load Project. The Load Project view offers four sources; the Load Project view section has the details.
| Source | What it does |
|---|---|
| From Project | Browse to a project file (.ff1r or .ff1a) and open it. |
| From MRU | Choose from recently opened projects. Only shown once you've opened or created one; the two most recent are also listed beneath it as direct links. |
| From Archive | Unpack an HFF1 archive (.hff1zip, made with Landing's export button) into a
new folder under a new name, then open it. |
| Clone Existing | Copy an existing project into a new folder under a new name, then open the copy. |
When a project opens, the app shows its Landing view.
- Moved projects. A project records its serializer relative to the app folder or the project folder, so it keeps working after it's moved, copied, cloned, or archived.
- Missing serializer. If the project uses an extension serializer that isn't where the project last found it, the app looks for the same extension elsewhere and quietly re-points the project if it finds exactly one copy. If it finds none, or more than one, it explains what's missing and lets you pick from the serializers that can open that kind of project. Your choice is saved to the project file. Declining returns you to the Welcome view.
- One instance per project. A project can be open in only one running copy of the app at a time. Opening it in a second copy is declined with a message.